How do you install a car seat correctly?
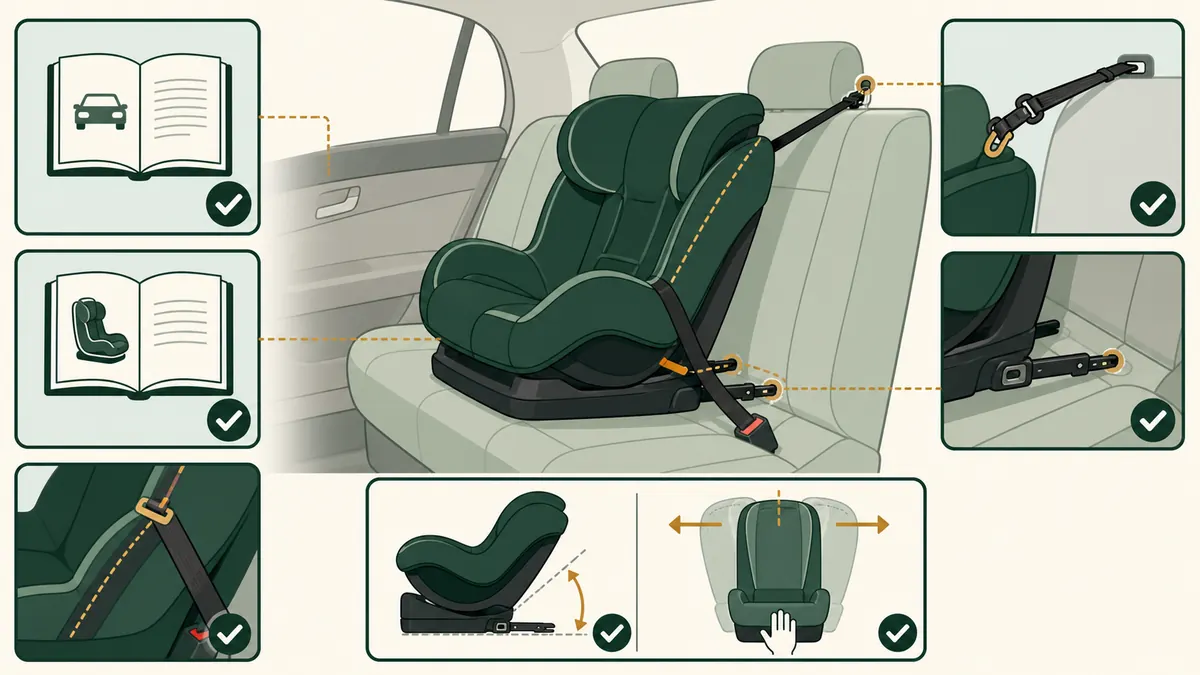
Read the car-seat manual and vehicle owner’s manual together. Choose a permitted rear seating position and secure the seat with either the vehicle seat belt or lower anchors—not both unless both manufacturers explicitly allow it. Route the belt or lower-anchor strap through the correct belt path, remove slack, and lock or tighten it as instructed. Keep a rear-facing seat within its approved recline range, and use the top tether for a forward-facing harnessed seat when directed. Pull at the belt path: the seat should not move more than one inch side-to-side or front-to-back. Finally, fit the harness to the child and consider a check with a certified Child Passenger Safety Technician (CPST).
Read two manuals before touching the seat
The car seat manual tells you what the seat allows. The vehicle manual tells you what your back seat allows. NHTSA advises parents to read both before installation because lower anchor positions, seat belt locking methods, tether anchor locations, and center-seat rules vary by vehicle.
If you are still choosing a seat, start with how to choose a car seat, then use the car seat safety checklist before buying.
Most installations use either LATCH or the seat belt, not both. Some seats have special instructions, so the manual always wins.
The seven checks that matter
The back seat is the standard location. Confirm whether your vehicle permits the center position for your chosen method and whether the seat sits flat without tilting.
Use lower anchors if the child and seat are within the stated LATCH limits. Use the seat belt when required by the manual, when lower anchors are not available, or when the child exceeds the lower-anchor weight limit.
Rear-facing and forward-facing belt paths are different. Follow the color coding and label on the car seat shell, then remove slack from the belt path before locking the belt or tightening lower anchors.
After tightening, grip the seat at the belt path and move it side to side and front to back. It should not move more than one inch at that point. Movement at the top of a rear-facing seat is not checked the same way.
Rear-facing seats need the correct recline angle so the baby's airway stays open. Newborns often need the most reclined allowed setting. Older babies may use a more upright allowed setting if the manual permits it.
The top tether reduces forward movement in a crash. Locate the approved tether anchor in the vehicle manual and attach the tether when the seat is forward-facing with a harness.
Harness straps should be routed at or below the shoulders for rear-facing and at or above the shoulders for forward-facing, unless the manual gives model-specific instructions. The chest clip belongs at armpit level.
Seat-belt installation
Use the belt path for the current direction, buckle the belt, and lock it using the method in the vehicle manual or an allowed car-seat lock-off. Remove slack without changing the approved recline, then test at the belt path.
Lower-anchor (LATCH) installation
Use only the designated anchor pair for that seating position. Keep the strap untwisted, attach and tighten it, and remain within the limit stated on the seat label and in both manuals. When the limit requires it, reinstall with the seat belt. Neither method is universally safer; correct fit and installation decide which works in the vehicle.
Rear-facing installation
Use the rear-facing belt path and keep the angle indicator within the approved range. Harness straps should generally be at or below the shoulders, flat and snug; follow the exact model instructions for inserts and child fit.
Forward-facing installation
Use the forward-facing belt path. Attach the top tether to the designated vehicle anchor when permitted and directed; it works with either a lower-anchor or seat-belt installation. Harness straps should generally be at or above the shoulders.
Installation correctness checklist
The position, direction, method, belt path, recline and attachment limits are allowed.
Seat belt or lower anchors secure the seat; both are used only if explicitly permitted.
The seat moves no more than one inch side-to-side or front-to-back there.
Rear-facing recline is approved; forward-facing tether use follows both manuals; the harness is flat, snug and correctly positioned.
Have a CPST check it
A Child Passenger Safety Technician can inspect the installation and teach you how to repeat it. NHTSA maintains installation tips and an inspection-station locator; use those official resources before relying on confidence alone.
Helpful official resources: NHTSA car seat installation tips and NHTSA installation help and inspection locator.
Install the seat at least two weeks before the due date, then get it checked before the first ride home. Recheck after moving the seat to another vehicle.
Why independent test results do not eliminate installation risk
Model-level testing can reveal fit-to-vehicle or usability differences, but it cannot establish that a seat fits every child, vehicle or seating position. Federal compliance likewise does not prove a particular installation is correct. Use test evidence as one layer, then verify the exact seat in the actual vehicle with both manuals.
Authoritative sources and further verification
Use the linked NHTSA installation tips and inspection locator above, both manuals, and current exact-model recall or corrective-action records. Continue with the seat-type comparison or product verification.
Car seat installation FAQs
Confirm every step in both manuals and test for no more than one inch of movement at the belt path.
No method is universally safer; use the allowed method that achieves a correct installation.
Only when both manufacturers explicitly permit it.
No more than one inch side-to-side or front-to-back when pulled at the belt path.
Use NHTSA’s locator to find a certified Child Passenger Safety Technician or inspection station.